Polymer Clay Earrings: Estimate Grams Before You Bake
Want consistent, comfortable polymer clay earrings without guessing? This guide gives practical grams-per-earring targets, a simple thickness and size framework, and an easy way to estimate clay weight from a photo so you can price, list, and ship with confidence.
Polymer clay earrings can look perfect on the baking tray, then feel surprisingly heavy once they hit your ears. That extra weight can turn a cute design into an uncomfortable wear, and it can also make your listings inconsistent when you cannot predict grams per pair. In this guide, you will learn practical weight targets for common styles, a simple thickness guide that keeps pieces lightweight but sturdy, and a repeatable, photo-based workflow to estimate grams before you bake, batch after batch.
How many grams should polymer clay earrings weigh

A 2 g difference sounds tiny on paper, but on your ears it can be the difference between “I forgot I’m wearing these” and “I need to take them off after lunch.” Earlobes are sensitive, and weight hangs from a small point, so comfort is about both total grams and how that weight is distributed. A flat, wide piece can feel easier than a dense, dangling charm, even if the scale reads the same number. The goal is to pick a target weight range you can repeat, then sanity-check every new shape before you bake a whole batch and commit your time, clay, and hardware.
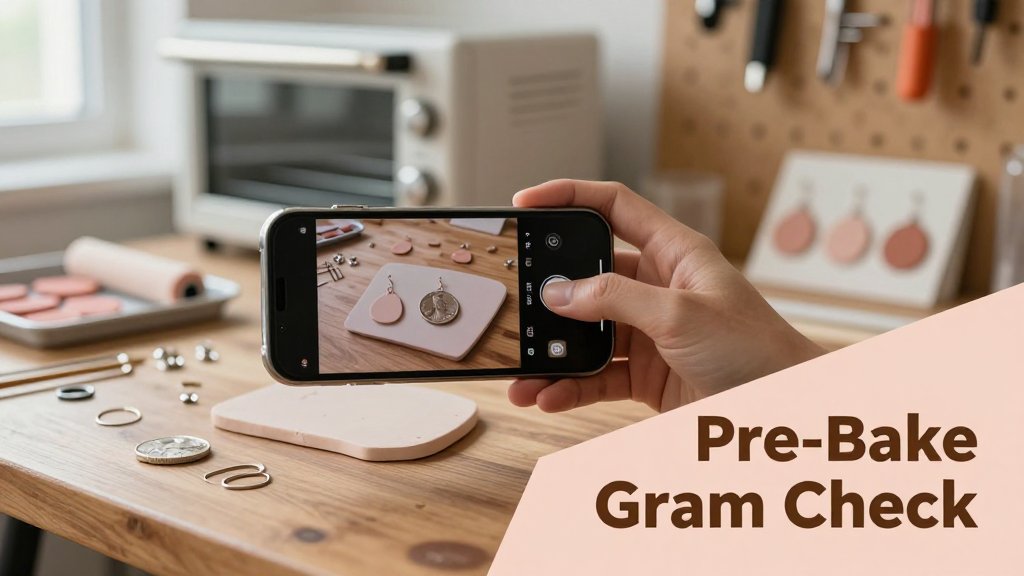
If you do not have a physical scale next to your clay tools, treat weight like a quick design checkpoint, not a mystery. Take a photo of one assembled earring next to a known object (like a US nickel at 5.0 g), then use an app like Scale for Grams to get a fast estimate before you bake 20 pairs. This same “estimate first” habit helps in the kitchen too, especially if you are used to checking portion sizes by weight instead of volume. If you like quick conversion references, bookmark grams in a cup of kibble as another example of why small measurement gaps add up in real life.
Comfort targets that actually feel good
Most comfortable polymer clay earrings land around 2 to 6 g per earring, depending on hardware and size. For many people, 6 to 10 g per earring is a wearable “statement” range, especially if the shape is wide and balanced. Once you get into 10 g+ per earring, some wearers will still love them, but more customers start calling them “heavy.” A useful cross-check is mainstream jewelry comfort advice: this earring weight guidance notes that anything over about 7 to 8 g per earring is generally considered heavy. Also, beginners often get surprised by findings, because hooks, jump rings, and posts often add about 0.3 to 1.5 g per earring.
Write your targets as both “per earring” and “per pair,” since that is how customers feel it when they wear them. Example: if your clay cutout is 3.8 g, your stud post and backing are 0.7 g, and you add a tiny charm at 0.9 g, you are already at 5.4 g for one ear and 10.8 g for the pair. That is still in a comfortable daily range for lots of people, but it is no longer “ultra lightweight.” Another example: a big 45 mm arch shape might look like it should be heavy, but if it is thin and paired with light stainless findings, it can land at 4.5 g per earring and feel airy.
A fast sanity-check before baking a full tray is to prototype one full earring exactly as you would sell it, then decide if you need to edit thickness, size, or hardware. Assemble the raw clay piece with the same jump rings, posts, or hooks you will use later (even if you will glue after baking, you can temporarily tape the parts together for a weight check). If you are shipping, add a rough “mail-ready” number too: finished pair weight plus a small jewelry box, tissue, and padded mailer can easily add 30 to 80 g to the package, which matters for postage tiers and customer expectations.
Before you cut a full tray of shapes, build one complete earring with findings and finish. If it lands under about 7 g, most people can wear it for hours. Above that, adjust thickness or hardware.
Common mistake: only weighing the clay
The most common weight mistake is weighing only the clay blank, then calling the final piece “lightweight.” The finished feel is clay plus findings plus any resin topcoat plus any added charms. A realistic example: you weigh a raw clay circle at 2.9 g and feel great about it. Then you add a stainless post (0.6 g), a backing (0.2 g), two jump rings (0.2 g total), and a thin resin coat plus glitter (0.4 g). Your “2.9 g” design is now 4.3 g per earring, which is still comfortable, but it is a 48 percent jump from what you planned.
Here is the counterintuitive tip that saves a lot of designs: a slightly larger shape can feel lighter if you reduce thickness and avoid heavy metal charms. Polymer clay weight scales fast with thickness because you are adding volume, not just “a little extra.” If you take a 35 mm tall dangle from 3.5 mm thick down to 2.5 mm thick, you reduce the clay mass by about 29 percent while keeping the same silhouette. You can get that bold look customers want, then keep comfort by using smaller jump rings, skipping chunky tassel caps, and choosing lighter charms (or none).
To keep your notebook and your product listings consistent, write two weights in every product plan: “earring-only” and “finished with hardware.” “Earring-only” is the clay piece as it comes out of the oven, fully cured and sanded. “Finished with hardware” includes posts or hooks, jump rings, resin, charms, and anything else that ships to the customer. This habit makes batch planning easier too, because if your finished target is 5.5 g per earring and your findings are consistently 1.0 g, you know your clay budget is about 4.5 g per earring. That is how you iterate quickly without baking five versions to find the sweet spot.
Polymer clay thickness and size weight guide
If you want to predict how “heavy” an earring will feel before you bake, think like a cutter: weight mostly comes from (1) thickness, (2) surface area, and (3) how much clay you remove with cutouts. Surface area is the sneaky one because a shape that looks airy on the table can still be a big slab once it is a solid silhouette. For example, a simple 25 mm circle at 2 mm thick can feel feather-light, but a trendy tall arch silhouette (about 45 to 55 mm tall) at 3 mm thick can start feeling noticeable after a few hours, especially if you add chunky hardware. The good news is that polymer clay gives you a lot of control, and you can keep strength while shaving off grams in smart places.
Thickness rules for strength vs weight
A simple thickness starting point that works for most makers is: about 2 mm for lightweight dangles and layered pieces, about 3 mm for sturdier shapes and single-layer statement pieces, and thicker only when you truly need structure (like a wide cuff, a sculpted element, or a piece that will get stressed at the connector). If you use a pasta machine, this usually means you pick one setting and stick to it for a full collection so your weights stay predictable. Thickness is the fastest lever for weight control because for the same cutter shape, doubling thickness roughly doubles clay mass. If your 2 mm slab feels perfect, a 4 mm slab of the same shape can jump from “all-day comfy” to “I want to take these off at lunch.”
Here is the practical “shop math” most earring makers use: keep the shape the same, and compare thickness. A 30 mm circle at 2 mm thick often lands around 1.5 to 2.5 g per baked piece, depending on the brand and how much you sand. Make that same circle 3 mm thick and you are commonly closer to 2.5 to 3.8 g per piece, which is a big jump once you add jump rings and a post. Scale up the silhouette and thickness matters even more. A tall arch or rounded rectangle around 50 mm tall at 3 mm thick can easily land in the 4 to 7 g per piece range if it is solid, which can feel heavy as a pair on sensitive ears. Dropping to 2 mm, or adding negative space, usually makes a bigger comfort difference than changing hooks.
Treat all those numbers as ranges, not promises, because brands and lines vary a bit in density and flexibility. A firmer line (like some “professional” lines) can feel slightly denser than an ultralight, suede-like line, and your conditioning style also changes how compact the clay gets. The easiest way to calibrate once is to bake a small set of test tiles: one 2 mm slab and one 3 mm slab, cut with the same cutter you use all the time (like a 25 mm circle). Weigh them after baking and finishing, then write down the result as your personal baseline. Also remember that baking guidance is thickness-based, so measuring thickness is not just about weight. Sculpey’s instructions, for example, reference baking time per thickness in their baking time guidelines, which is another reason consistent slab thickness makes your results more repeatable.
Design tricks that cut grams fast
Cutouts are the fastest “no-compromise” way to drop grams because they remove mass without making the remaining clay thinner. A large arch shape with a center cutout is the classic example: take an arch that is about 50 mm tall and 30 mm wide at 3 mm thick. If it is solid, it can feel heavy quickly once you add findings. Add a simple oval cutout in the center (even a 12 to 18 mm oval) and you can drop weight noticeably while keeping the outer rim thick enough to stay strong. The trick is to leave extra clay around high-stress spots: keep a wider border near the top hole, and avoid razor-thin bridges where a jump ring could pry the clay over time. If you want the “solid look,” do two small side cutouts instead of one big center hole, so the silhouette still reads bold.
The hollow “frame” look is basically cutouts with intention, and it is perfect for statement shapes that need to stay light for shipping and for comfort. Think of it like building a picture frame: a 3 mm thick border around the outside, but open space inside. Another weight saver that still feels premium is layering strategically. Instead of one 3 mm slab with a big, flat face, use a 1 mm to 1.5 mm decorative veneer on top of a lighter, thinner backing, then keep the overall thickness around 2.5 to 3 mm only where you need strength (near holes, posts, or connectors). You can also reduce “hidden thickness” by smoothing seams and trimming backing flush, because a lumpy edge can add grams in places you do not see but your ears still feel.
Hardware can quietly add both grams and perceived heaviness because it changes how the earring swings. If a clay piece is already on the edge, swap the metal before you redesign the whole silhouette. A chunky charm, tassel cap, or thick cast connector can add a few grams by itself, and it often puts the weight farther from the ear, which makes it feel heavier than the scale number suggests. Try a thin stamped connector or a simple open link instead. As a real-world comparison, changing from a bulky decorative connector (around 2 to 3 g) to a thin stamped connector (often under 1 g) can make a pair feel dramatically more wearable, even if the clay stays the same. Keep jump rings and chains short, use the smallest post pad that still gives a good glue surface, and aim for a balanced build so the earring sits stable instead of tugging forward. For shipping, those gram-level tweaks also help you stay under common package thresholds without having to downsize your design.
Estimate clay and shipping weight without a scale
If you sell earrings or ship samples, the stressful part is not knowing if a new design will land at 12 g or 28 g once you add hooks, a backing card, and packaging. The good news is you do not need perfect lab accuracy to make good decisions. You need a repeatable estimate that is consistent across batches, so your product listings stay stable and your shipping label weight is not a surprise. Aim to estimate in grams first (it is easier to add small parts), then convert to ounces for US shipping. Being within 1 to 2 g on the clay portion is usually enough to set comfort targets for wearability and to plan packaging.
A repeatable photo estimate workflow for batches
Pick one reference item and stick with it, because consistency is what makes photo-based estimates useful. A standard credit card (85.60 mm by 53.98 mm) is great because it is flat and easy to align, and a US quarter works well for small shapes. Roll your clay slab to your chosen thickness (for example, 3 mm), place 4 to 8 cut shapes next to the reference, and take a straight top-down photo in bright, even light. In Scale for Grams, estimate the grams for that set of shapes, then divide by the number of shapes to get a “grams per piece” baseline for that cutter and thickness. Next time you batch 24 pieces, you multiply instead of guessing.
After you have a clay-only baseline, add the parts you always use so your listing weight matches reality. Typical lightweight findings add up fast: a pair of fishhook ear wires is often about 0.6 to 1.2 g total, jump rings are often about 0.05 to 0.15 g each, and a pair of small stud posts plus backs can add roughly 0.3 to 1.0 g depending on style. Then add packaging ranges you can standardize: a backing card is often 3 to 6 g, a small organza bag can be 2 to 4 g, a poly mailer can be 5 to 12 g, and a bubble mailer is often 10 to 18 g. Record your “typical packed weight” in notes right after you estimate it.
Once you have one good baseline, treat it like a recipe. Save a note like “Arch cutter, 3 mm, clay only: 5.5 g per pair” and “Packed with bubble mailer: 32 g total.” For shipping labels, you can convert grams to ounces with a quick divide by 28.35 (for example, 32 g is about 1.13 oz). The conversion is based on standard mass definitions, and you can sanity check it in the NIST unit table. Shipping tools often round up to the next whole ounce, so giving yourself a 5 to 10 g buffer helps keep you out of the next weight tier.
> Consistency beats perfection. Use the same photo setup, the same thickness, and the same packaging every time. If your estimate is off by 2 g, your listings stay consistent and your shipping labels stay predictable.
How much do polymer clay earrings weigh in grams
Most polymer clay earrings land in predictable ranges once you separate “clay only” from “finished pair.” Small stud-style pairs are often about 3 to 8 g finished, especially if they are 10 to 16 mm and kept thin. Medium dangles (think 25 to 45 mm tall) commonly fall around 6 to 18 g per finished pair, depending on thickness and hardware. Larger statement styles can be 20 to 35 g per pair, especially with stacked layers or chunky connectors. Your bake result is usually close to your pre-bake estimate, so a photo estimate is practical for planning comfort and listings.
How do I price polymer clay earrings by weight
Pricing by weight works best as a consistency check, not as the only pricing rule. Start by finding your clay cost per gram. Example: a 2 oz (56 g) block that costs $2.80 is $0.05 per gram. If your Scale for Grams baseline says your design uses 7 g of clay for a pair, your clay cost is about $0.35. Then add findings (often $0.30 to $1.50 per pair), packaging ($0.20 to $0.80), and labor. Weight-based baselines help you spot outliers fast, like a “small” design that secretly uses 14 g of clay and should be priced closer to your heavier pieces.
What is the shipping weight for polymer clay earrings with packaging
A realistic shipping weight is the earrings plus the exact packaging you plan to use every time. As a quick guide, a lightweight “card plus poly mailer” setup often lands around 20 to 35 g total (about 0.7 to 1.2 oz). A bubble mailer setup often lands around 30 to 60 g (about 1.1 to 2.1 oz). A rigid mailer with extra protection can be 45 to 90 g (about 1.6 to 3.2 oz). Example: 14 g finished earrings + 5 g backing card + 14 g bubble mailer is 33 g total, about 1.16 oz, which many sellers would label as 2 oz to stay safe.
If you want this to feel effortless, build a tiny “shipping library” the same way you build a cutter library. Pick 2 packaging options you will standardize (for example, poly mailer for studs and bubble mailer for dangles), then store one baseline packed weight for each best seller. If you add a freebie sticker, a care card, or a spare set of backs, estimate that add-on once (often 1 to 4 g total) and add it to every future packed estimate. Over time, your Scale for Grams photo estimates turn into repeatable numbers you can use everywhere: product descriptions, cost sheets, and shipping presets that do not need last-minute scrambling.
Need to weigh something fast without pulling out a scale every time? Download Scale for Grams and get an AI-powered weight estimate from a photo in seconds. It is a quick way to sanity-check clay components before you bake, so your finished earrings stay comfortable and your product weights stay consistent. Grab the app here: iOS, then test it on your next tray of pieces.
Need to Weigh Something?
Download Scale for Grams and get an AI weight estimate from a photo in seconds.