Resin Pour Math: Convert Mold Volume to Grams
Stop guessing and overmixing. Learn a simple, repeatable way to measure mold volume, convert that volume to grams using epoxy density, and mix Part A and Part B by weight so your pours cure right the first time. Includes a quick conversion cheat sheet and a photo-based estimation workflow with Scale for Grams.

A flawless resin piece starts long before you pour, because even a perfect mold can fail if the mix is off by a few grams. Measuring by “mold size” leads to waste, soft spots, and sticky cures. In this guide, you will learn how to convert mold volume into total grams using resin density, then split that total into Part A and Part B with confidence. You will also see how to scale small batches accurately so every pour cures cleanly.
How to turn mold volume into resin grams
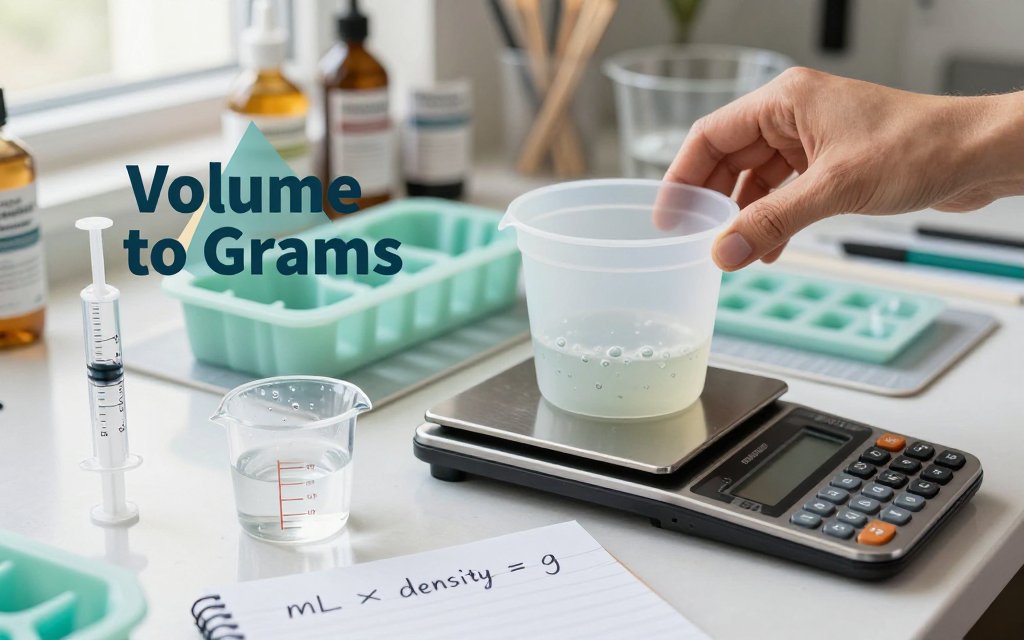
You want a number of grams you can actually mix, not a vague “fill the mold halfway” guess that turns into a thin spot, a dome, or a panic top-off. The shortcut is a simple formula you can reuse on every mold: Total resin grams = mold volume in mL × resin density in g per mL. Once you have grams, you can measure accurately on a kitchen scale, or even sanity-check an estimate when you are away from your bench, the same way you might estimate remaining yarn grams before starting a project. A practical goal for most pours is to calculate the grams, then mix an extra 3 percent to 8 percent for cup cling and stir-stick loss.
First, get the mold volume in mL. Two fast at-home approaches work well. Method one is direct volume: fill the cavity, then pour that liquid into a marked measuring cup, medicine cup, or (best for accuracy) a large syringe so you can read mL clearly. Method two is “weigh water as volume”: if you have a scale, 50 g of water is about 50 mL, so you can fill the mold with water, pour into a cup, and also weigh it to double-check the reading. If you only have rough dimensions, you can still get close by treating the cavity like a simple shape (rectangle or cylinder), calculating cubic centimeters, and using the handy fact that 1 cubic centimeter equals 1 mL.
Measure mold volume with water, rice, or alcohol
For most silicone molds, water is the easiest, cheapest “test fill.” Put the mold on a level surface, then fill it to the exact rim line you plan to pour to. If your final piece will be slightly domed, mimic that dome height with water too. Tap the mold on the table 10 to 20 times to pop trapped bubbles, especially in lettering, prongs, or corners, because bubbles steal real volume. Pour the water into a syringe or measuring cup and record the mL. Then do the unglamorous step that saves pours: dry the mold completely. A quick towel wipe is not enough; let it air-dry, or use gentle airflow so no hidden droplets create cure issues or cloudy spots.
Rice is a good backup when you cannot use water (for example, a mold with a porous insert or a piece you cannot fully dry quickly). Fill with dry rice, shake lightly to settle it, then pour the rice into a measuring cup to get an approximate mL. Treat rice as “close, not perfect” because grains leave tiny air gaps, so plan a little extra resin. For very small cavities, isopropyl alcohol can be easier than water because it releases bubbles more readily and flows into tight detail. Fill the cavity with alcohol, tap once or twice, then pull it back out with a syringe to read the mL. Afterward, let the alcohol evaporate fully before you pour resin.
“Most failed pours I see are not bad molds or bad resin. They are math problems. A 10 percent underpour is annoying, but a wrong ratio by weight can stay tacky forever.”
Pick the right density number for your resin
Here is the reality check that trips people up: 1 mL is not always 1 gram for epoxy. Water is conveniently 1 g per mL, but many casting epoxies land around 1.05 to 1.15 g per mL, and pigments, mica, glitter, chopped fiber, or metal fillers can push it higher. Look for “density” or “specific gravity” on the technical data sheet, product label, or the manufacturer FAQ. Many brands publish a chart of typical physical properties, including specific gravity (which is effectively the same number as g per mL for quick resin math), such as this Smooth-On density chart. If you cannot find a number, start with 1.10 g per mL as a reasonable middle-of-the-road estimate, then adjust after one test pour.
A one-time calibration makes your future pours fast and repeatable. Measure a known volume, like 20.0 mL, of your mixed resin (resin plus hardener combined, before you add heavy fillers). Weigh that cup of mixed resin in grams, then compute density as grams divided by mL. Example: if 20.0 mL weighs 22.4 g, your working density is 1.12 g per mL. Now you can do the math for any mold: a 32 mL mold at 1.10 g per mL equals 32 × 1.10 = 35.2 g, so you mix about 35 g total (or round up to 37 g if you know you lose a little on the cup walls). Keep your manufacturer’s mix ratio exact by weight, and write your density and “extra percent” on the bottle for next time.
Resin mixing ratio by weight, without surprises
Here is the cure-saving rule that keeps small batches from turning gummy: Once you have total grams, split that weight using your resin’s stated ratio by weight, not by volume. A lot of “1:1” craft resins are 1:1 by volume, but the same product may not be 1:1 by weight because the resin side and hardener side do not weigh the same per milliliter. That is why your label might show two different ratios, or a chart for grams. Pick one method and stick to it for the whole batch. If you start with grams, finish with grams, especially for small batch resin mixing in grams like 20 g to 60 g total.
A practical workflow looks like this: put your mixing cup on a scale, tare to 0.0 g, pour Part A to its target grams, tare again, then pour Part B to its target grams. That second tare step is where people accidentally subtract the cup weight wrong, or forget they already tared, and the numbers drift. Another common fail is pouring both parts into the same cup too fast, overshooting Part B by 2 g, then trying to “fix it” by eyeballing more Part A. Many systems are not forgiving. Manufacturers warn against changing ratios for cure speed, and they emphasize accurate measuring in their dispensing and mixing guidance.
Worked example: 35 g total at 100 to 45 ratio
A “100 to 45 by weight” resin means that for every 100 g of Part A, you need 45 g of Part B. To split a total batch, treat the ratio like parts of a whole. Total parts = 100 + 45 = 145 parts. Now divide your target total grams across those parts. Part A grams = 35 × (100/145) = 24.1379 g. Part B grams = 35 × (45/145) = 10.8621 g. For most hobby projects, rounding to the nearest 0.1 g is a good goal if your scale supports it, so you would weigh 24.1 g of Part A and 10.9 g of Part B.
Why the rounding matters: on a 35 g batch, being off by 1.0 g is almost 3 percent of the total. That is enough to push some epoxies into soft spots, tacky surfaces, or slow cure times. If your resin also lists “1:1 by volume,” do not assume that means 17.5 g and 17.5 g by weight. It might, but it often does not. Choose the ratio that matches how you are measuring. If the instructions give a grams chart, use it. If they only give volume, measure in milliliters with graduated cups, not grams. Mixing methods are not interchangeable unless the manufacturer explicitly says they are.
Tare the empty cup, hit the Part A number, then add Part B until the total equals A plus B. Mix, scrape sides, and mix again. If you miss by more than 0.3 g, restart.
One-list cheat sheet: quick conversions and sanity checks
If you searched “grams to ounces for resin mixing,” you are usually trying to match a mold size, a kit label, or a shipping-friendly measurement like 2 oz cups. Use ounces only as a quick translation, then go right back to grams for the actual pour. Also do one fast sanity check before you waste resin: if your mold volume estimate was 30 mL and you somehow ended up planning 80 g of resin, something is off (either the volume measurement, trapped air space, or the density assumption you used back in the grams step). These quick numbers help you spot that mistake in seconds.
One last tip that prevents overshoots: for small batches under about 50 g, pour Part B into a second cup first, then combine into your main mixing cup. It feels slower, but it stops the “oops, I went past 10.9 g” problem, especially with thin hardeners that gush out. If you do overshoot by more than a few tenths of a gram, do not try to eyeball a correction. Recalculate a new total based on what you actually poured, or discard and restart. A failed cure costs more time (and sanding) than a fresh 35 g batch ever will.
Estimate resin weight with a phone photo workflow
You are two minutes from mixing a fresh batch, gloves on, mold wiped, timer ready, and then it happens: your scale is dead. Maybe the batteries rolled under the workbench, or you are pouring at a market booth with no outlet, or your small shipping scale is busy weighing orders. Here is the good news: If you do not have a scale, you can still estimate grams closely enough to plan a batch, then refine on your next pour. The goal is not perfection, it is avoiding a wildly wrong batch size or an obvious ratio mistake when you are moving fast.
A phone workflow works best when you treat it like a double-check. First, you estimate how much resin your mold needs in milliliters, then you convert that volume to grams using an epoxy density you have saved (or a reasonable default). Next, you use Scale for Grams as a sanity check by photographing the empty mixing cup, then photographing the filled cup before you mix. Even if your estimate is off by a few grams, this quick visual weigh-in helps you catch the big problems, like accidentally pouring twice what you meant to pour, or starting a batch that is obviously too small to fill a deep mold.
A simple photo based routine that avoids overmixing
Start by estimating mold volume in mL the same way you would for baking, fill the cavity with water using a syringe or measuring spoon, then pour that water into a marked cup and note the mL. Convert mL to grams using your saved density (for example, 120 mL x 1.10 g per mL is about 132 g total mixed resin). Decide the total grams you want to mix, and add a little extra, usually 5 to 10 percent, if the mold is deep or you know you lose resin to cup walls and stir sticks. Before mixing, take a photo of your empty cup in Scale for Grams, then take a photo after you pour Part A and Part B. Subtract your empty-cup estimate from your filled-cup estimate to see if your resin total is in the ballpark.
This approach is best for planning totals, checking that you did not wildly overpour, and preventing big ratio mistakes when you are working quickly. For example, if your target is about 145 g mixed resin (132 g plus 10 percent), and the app estimate suggests your cup looks closer to 250 g of resin, you can stop before you waste material. It is also useful when you are making multiple small pieces, like six 25 mL coaster cavities, because it helps you confirm you poured roughly 150 to 170 g total before you commit to stirring. It is not for lab-grade accuracy, and it is not for ultra-critical micro-casting where a 1 g error can matter.
One practical example: say you are filling a ring dish mold that holds 70 mL. Using a density of 1.10 g per mL, you plan for 77 g total after adding 10 percent waste. You pour Part A and Part B into a clear cup, and Scale for Grams comes back with an estimate that suggests you are only around 55 g of resin after subtracting the empty cup. That is your cue to add a bit more before you mix, rather than mixing a short batch and then scrambling to make a second mini batch that might cure slightly differently. After this pour, borrow a scale once, record your real grams for the same mold, and refine your saved density and waste factor for next time.
How much resin do I need for my mold?
Use this exact sequence. Step 1: measure your mold volume in mL (water fill method is fastest). Step 2: multiply mL by your resin density to estimate grams of mixed resin. Example: 95 mL x 1.10 g per mL = about 105 g. Step 3: add a waste factor, typically 5 to 10 percent, so you do not come up short after resin clings to the cup and stick. Intricate jewelry molds often need the higher end because you drip more, and resin can cling inside narrow channels and vent details.
What density should I use for epoxy resin in grams per mL?
A realistic default for many clear epoxies is about 1.05 to 1.15 g per mL, and you will see similar “specific gravity” values on technical charts, for example in this specific gravity chart. Brands differ because resin and hardener chemistry varies, and some systems are designed for deep pours, coatings, or filled casting. Do a one-time calibration when you have access to a scale: measure 50 mL of mixed resin, weigh it, then set density as grams divided by 50. Heavy pigments, mica, and fillers can raise the effective density, so re-check if you change your recipe.
Can I measure resin without a scale, and how accurate is a phone scale app?
Yes, you can measure well enough to plan, but it helps to separate planning accuracy from mixing accuracy. For planning, a phone photo estimate is often close enough to choose a sensible batch size, avoid doubling your pour by accident, and keep your resin-to-hardener totals in a reasonable range. For mixing, especially with resins that specify a strict ratio by weight, a real scale is still the safest tool. If you do lots of small jewelry batches, borrowing a 0.01 g jewelry scale is worth it for the most ratio-sensitive formulas. Always follow the manufacturer ratio by weight when it is stated, and treat the phone estimate as a guardrail, not a certificate of precision.
If you want a faster, calmer workflow the next time your scale disappears, keep Scale for Grams on your iPhone as your backup. Snap a quick photo of your empty cup and your filled cup, sanity-check your estimated resin grams, and get back to mixing before your pot life clock eats your setup time. It is also handy for makers who bounce between resin work, portioning food by weight, and shipping packages, since the same quick photo habit helps you estimate grams, ounces, and kilograms when you are away from your main tools. Download Scale for Grams on iOS and set up your resin density note once, then your next pour is a lot less stressful.
Need to weigh something fast while you are mid-project? Download Scale for Grams and get an AI-powered weight estimate from a photo in seconds, then use that number to plan your next resin mix with less guesswork. Try it on tools, additives, or quick material checks before you commit to a pour. Get the app here: iOS.
Scale for Grams
Need to Weigh Something?
Download Scale for Grams and get an AI weight estimate from a photo in seconds.